• Skip to primary navigation
  • Skip to main content
  • Skip to primary sidebar
  • Skip to footer

Kimberly Layton

Blogger.

  • Shop

Featured

St. Patrick’s Day Crochet Shamrock Pattern & Video Tutorial

March 5, 2020 By Kim

St. Patrick’s Day Crochet Shamrock Pattern & Video

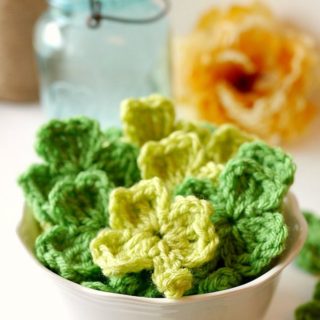
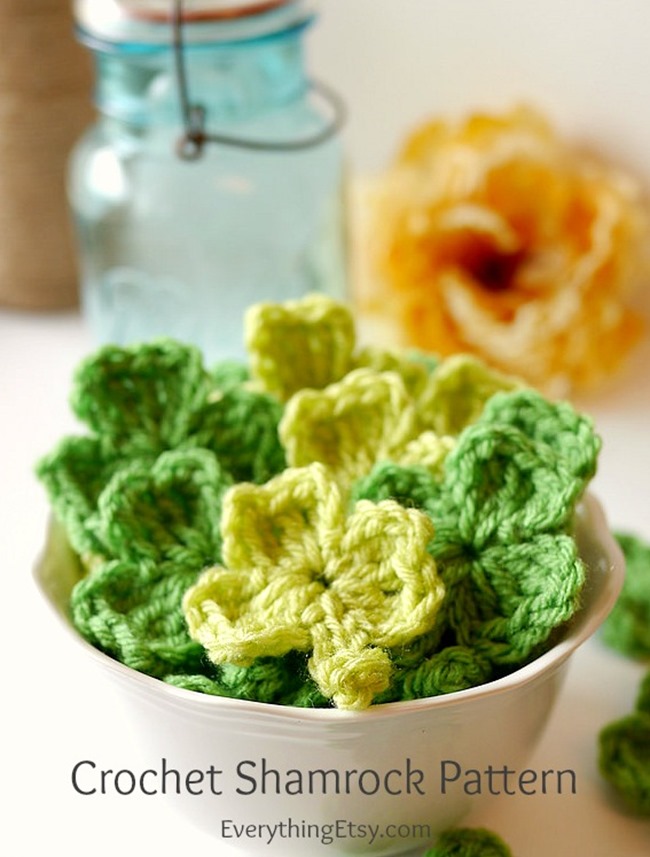
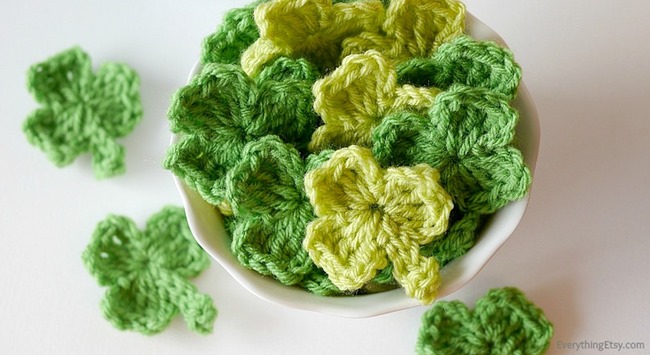
Create a batch of crochet shamrocks this St. Patrick’s Day!  This simple shamrock crochet pattern will have you decorating your whole house and sharing a little luck with your friends and family.  Just follow the pattern or watch the video tutorial and you’ll have a pretty bowl of shamrocks  in no time flat!

Click here for the Crochet Shamrock Pattern & Video Tutorial!

Once you start it’s hard to stop making them!

You can make this in minutes…

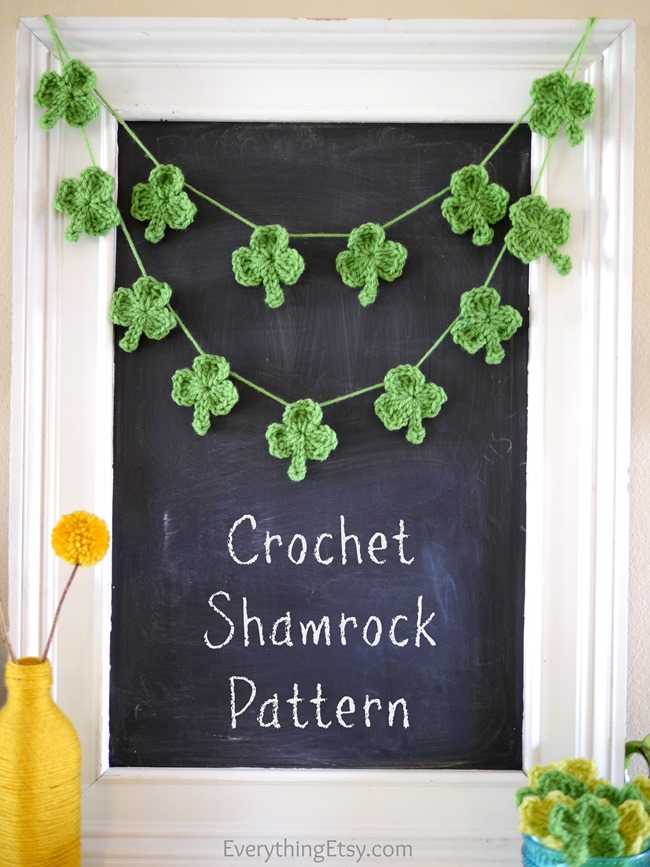
Crochet Shamrock Banner

Just string them together to create a sweet little holiday banner that you can hang anywhere.  What a fun little project!!

Happy St. Patrick’s Day!

~Kim

Filed Under: Crochet, DIY, Featured Tagged With: crochet pattern, crochet video, DIY, diy decor, free crochet pattern, free pattern, holiday, shamrock, shamrock banner, st. patrick's day, tutorial

Garlic Cauliflower Mash Recipe

November 12, 2014 By Kim

Garlic Cauliflower Mash Recipe on KimberlyLayton.com

Once you try this Garlic Cauliflower Mash recipe you’ll never look at regular old mashed potatoes the same way.  These were simply amazing, and I plan on making them for every single holiday or special day for the rest of my life.  Seriously.

I grew up with mashed potatoes being one of my all-time favorite things in the world.  When I decided to make Cauliflower Mash I was hoping for something that was a pretty good replacement for all the carbs that make up mashed potatoes.  I can’t even explain how shocked I was when I found out just how amazing cauliflower could really be…it rocks!

Cauliflower to Better than Mashed Potatoes in Minutes

 I started with fresh cauliflower…it’s way better for you than potatoes.

Cauliflower Mash Ingredients on KimberlyLayton.com

I gathered up a few yummy ingredients.  My family like some serious flavor, so I add quite a bit to them.  Feel free to change them up to make them perfect for you.  This is a simple recipe that seems pretty hard to mess up…so get creative.

Here’s what I did…

Garlic Cauliflower Mash Recipe
Author: Kimberly Layton
Ingredients
  • 1 Head of Cauliflower or 2 10 oz. packages of fresh Cauliflower
  • 1/2 cup Chicken Stock {I used Reduced Sodium Chicken Stock}
  • 1/2 cup Colby/Cheddar Shredded Cheese
  • 1 Tablespoon of Olive Oil
  • 1 teaspoon of Minced Garlic
  • 2 teaspoons of Parmesan Cheese
  • 1 oz Cream Cheese
  • 1/4 cup chopped Chives
Instructions
  1. Start by preparing your cauliflower into small pieces {or florets} and adding them to a large pot of water. Bring them to a boil and cook for 30 minutes or until the cauliflower is soft.
  2. Drain the Cauliflower. Set aside for a minute.
  3. Add the olive oil to your pot along with the minced garlic…over medium heat let it cook for 3-4 minutes. Stir to keep it from burning.
  4. Add the cauliflower back into the pot, stir and let it cook for 3-5 minutes.
  5. Add in the chicken stock and continue to cook and stir for 5 minutes. The cauliflower will start to fall apart. No worries…it’s a good thing.
  6. Remove your cauliflower from the pot and add it to a mixing bowl.
  7. Add in the cream cheese and Parmesan Cheese. Mix with a mixer until it’s smooth. It will look just like mashed potatoes. If it’s too thick you can add in a bit more warm chicken stock, but I didn’t need to do it.
  8. Top it off with shredded Colby/Cheddar Cheese and Chives. You could add sour cream and butter if it would make you happy. This is happy food, for sure!
3.2.2802


Amazing Garlic Cauliflower Mash on KimberlyLayton.com

It was actually easier than making homemade mashed potatoes because I didn’t have to spend all that time peeling potatoes!

Garlic Cauliflower Mash Recipe by Kimberly Layton

Once you try this it will quickly become one of your favorites…trust me.  TRY IT!

This is the kind of recipe that can be tailored to fit the needs of so many diets.  Low-Carb and Keto diets fans…this is for you.  But it’s hard to tell it’s good for you, it won my teenage son over in one bite!  This is perfect for large crowds and I’m planning to make it this Thanksgiving.

Let me know what you think!

~Kim

Filed Under: Featured, Food Tagged With: cauliflower mash, cauliflower mashed potatoes, cauliflower recipe, garlic cauliflower mash, keto diet, keto recipe, low carb diet

DIY Hand Stamped Necklace

October 21, 2014 By Kim

DIY Hand Stamped Necklace Tutorial by Kimberly Layton

There’s something so special about a handmade gift like these sterling silver hand stamped necklaces.  I have always loved a sentimental gift or two, that’s for sure.

Create one for a grandma with grandchildren’s initials.  Make one for yourself with your initial to wear daily.  Stamp up one for a new mom.  There are so many great ideas for these DIY hand-stamped necklaces!

DIY Tutorial for Hand Stamped Jewelry by Kimberly Layton

These are Sterling Silver and made to be treasured for years and years!

Hand Stamped Necklace Tutorial by Kimberly Layton

Everyone loves them…even teenage girls!  You have to make a batch to share with the ones you love.

Hand-stamped-jewelry-metal-stamp-set_thumb

When I first started making these I had the hardest time in the world finding just the right supplies.  The size of rings and the thickness of blanks…yikes!  It was a total guessing game and I spent quite a bit to find the perfect supplies to create the look you see in the photos.

For the complete step-by-step tutorial {with lots of photos} visit my post on EverythingEtsy.com!

You’ll also find a list of supplies with links to make your shopping easy.  Using the right tools and supplies from the beginning will save you a ton of money!

Have fun!

~Kim

Filed Under: DIY, Featured Tagged With: DIY, diy gift, diy jewelry, hand stamped jewelry, handmade, initial necklace, mom, tutorial

Bath Bomb Tutorial

October 21, 2014 By Kim

Bath Bomb Tutorial by Kimberly Layton

Homemade bath bombs are an awesome afternoon project for any crafty girl!  I recently made these fabulous bath bomb using my Lush Inspired Bath Bomb recipe. They were featured in the beautiful Mollie Makes Magazine!

You can create bath bombs in so many different molds, so look at what you already have around the house before you get started.  Tart tins are super cute, small plastic containers and many soap mold will work perfectly.

Bath Bomb Recipe by Kimberly Layton

This is what you’ll need to make 12-24 bath bombs.

Supplies:

Baking Soda – 2 cups

Citric Acid – 1 cup

Corn Starch – 1 cup

Almond Oil – 3 tsp.

Essential Oils – 1tsp. total of Lemon & Lavender

Food Coloring – 8-10 drops

Rubbing Alcohol in a spray bottle

Creative Soap Molds or Mini Metal Tart Tins {I LOVE these!}

The links above will take you right to products I used to make your shopping a little easier!  I love getting my supplies delivered right to my door!

I use all high quality essential oils for my bath bombs and bath salts.  You use less with better oils and there are health benefits at the same time!  Try Lavender, Lemon and Peppermint together…it’s one of my favorite combinations!  Email me if you have any questions about oils and I’ll be happy to send you lots of helpful information!  KLayton1@comcast.net 

Bath Bomb DIY by Kimberly Layton

  • Add Almond Oil and your essential oils to a small container and mix well.
  • Add all the dry ingredients to a large bowl and mix well.
  • Slowly add the oils to your dry ingredients mixing as you go.  Take your time because you don’t want it lumpy.  I used a mixture of oils that help with allergy problems…we need it around here!
  • Add the food coloring while mixing.
  • Spray your mixture 5-10 times while mixing until it resembles the texture of damp sand that sticks together.  You might need to spray it a few more times to get it just right.
  • Add a heaping amount of your bath bomb mixture to your mold.  You just want to make whatever you use is not too shallow or your bath bomb will break easily.  These starfish are a little on the shallow side so I have to take extra time and care making them.
  • Press the mixture into the mold.  Add a bit more to the top and press it all over again.  This will make a very solid bath bomb.
  • Lightly mist the top of your bath bombs with alcohol.  I usually only spray one or two times and then press it down again.  If you spray too much your bath bomb with start to bubble!
  • Let it dry for at least 15 minutes.

Bath Bomb Tutorial on KimberlyLayton.com

  • Flip your mold over and lightly tap the mold with your spoon.  This will usually cause the bath bomb to pop right out, so be ready.
  • Mist the top of your bath bomb with alcohol.
  • Let it dry overnight.

Once you get the hang of making these you will think up a million different combinations of oils and creative molds.  They are a fabulous DIY gift anytime of the year.

There you go…now you don’t need to spend a ton buying them when you can make them for pennies!  WOOT!

Have fun!

~Kim

Filed Under: DIY, Featured Tagged With: bath bomb, bath fizzie, DIY, diy gift, Essential Oils, gifts for her, handmade, homemade

Primary Sidebar

Hi, I’m Kim!

Welcome to my blog about all things creative, Business Bliss Society, southern food, pottery and lots pretty things.

Don't forget to join my private Business Bliss Society group on Facebook!

For crafty posts and Etsy business tips check out my blog here... EverythingEtsy.com

  • Facebook
  • Instagram
  • Pinterest
  • Twitter

Subscribe Here:

Essential Oils Social Media Kit How to Start a Blog EverythingEtsy.com Start Selling Essential Oils Tutorials Gallery RemodelingGuy.net

Categories

Archives

Footer

Connect

I love to get to know my readers so leave me a comment on any post and you KNOW I'll get it!

I'm also at EverythingEtsy.com every day and HandmadeandCraft.com as well as a few other scattered places.

Feel free to contact me at Kim@KimberlyLayton.com!

  • Facebook
  • Instagram
  • Pinterest
  • Twitter

Copyright © 2025 · Kimberly Layton · All Rights Reserved · Contact Me | Privacy