• Skip to primary navigation
  • Skip to main content
  • Skip to primary sidebar
  • Skip to footer

Kimberly Layton

Blogger.

  • Shop

homemade

Mini Apple Bundt Cake Recipe

November 22, 2014 By Kim

Mini Apple Bundt Cake Recipe on KimberlyLayton.com

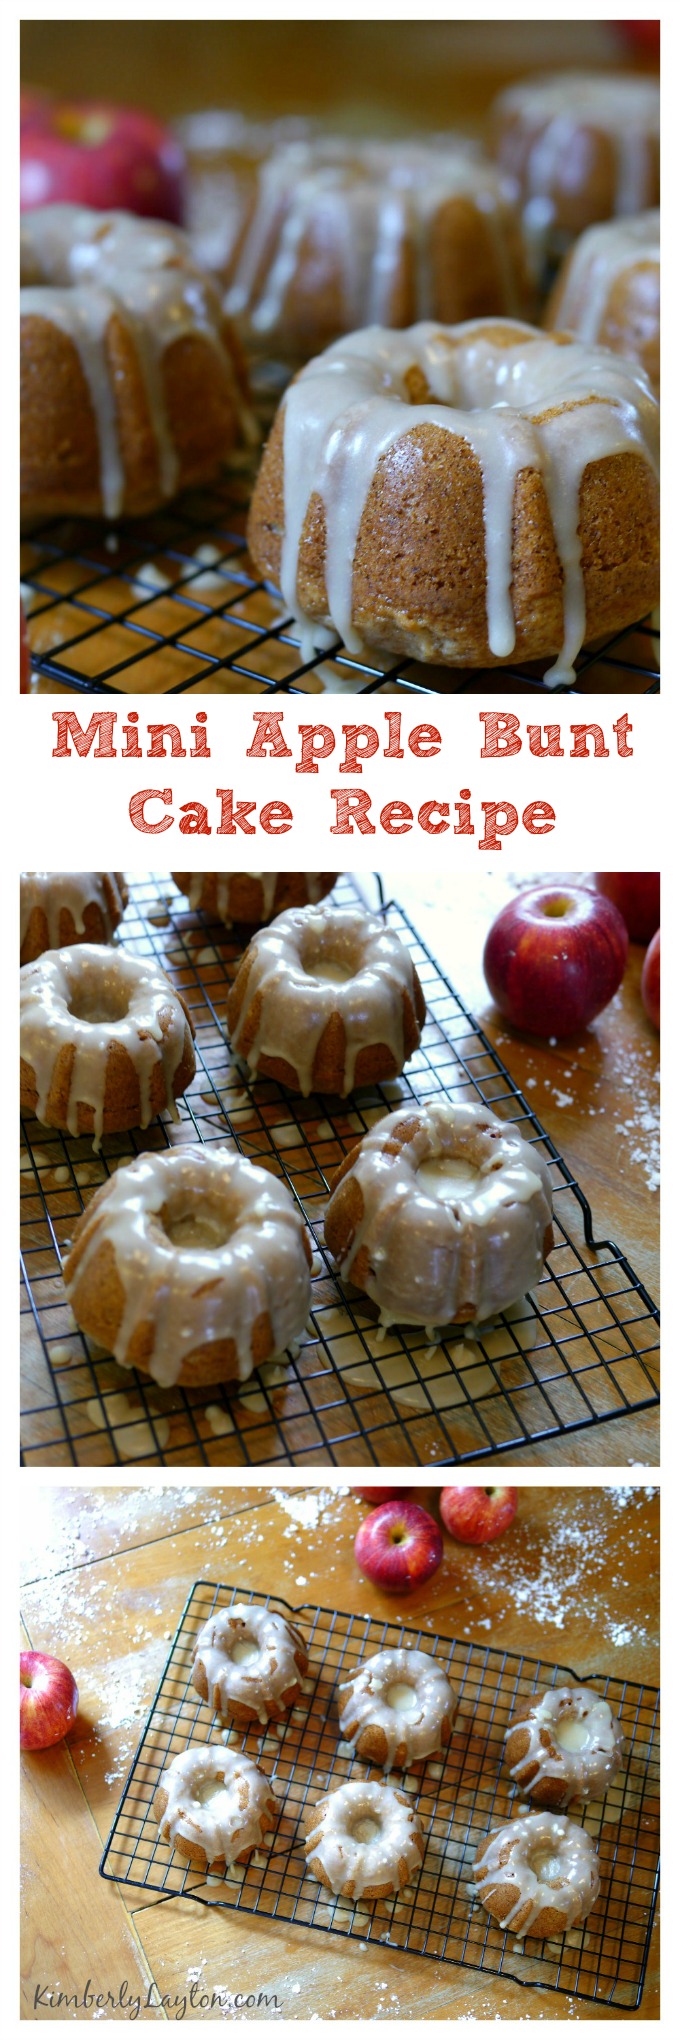
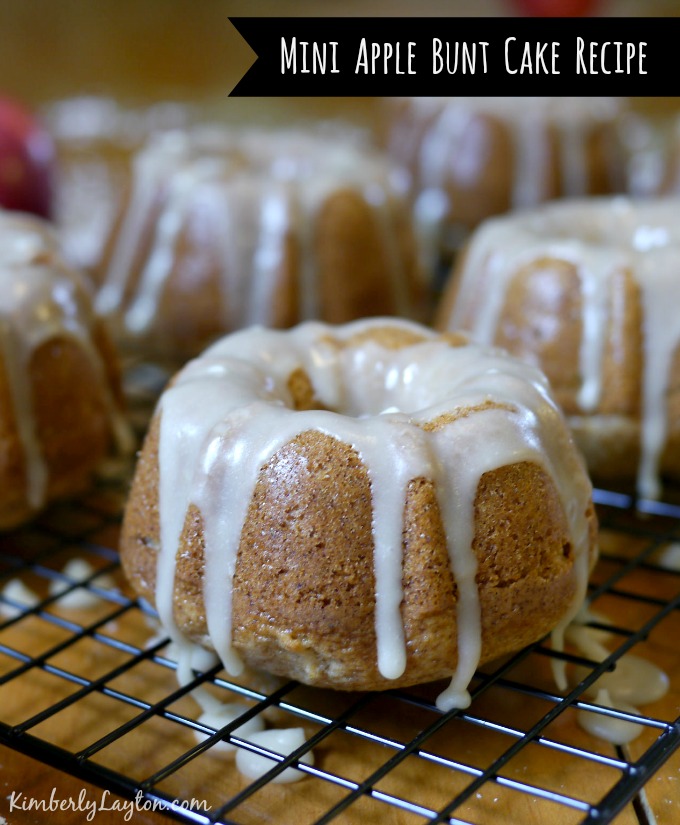
Homemade Apple Bundt cakes are great, but Mini Apple Bundt Cakes are even better!  They’re perfect for entertaining or sharing a bit with your neighbors.  Don’t you love how baking up something like this makes you house smell all yummy and cozy?  This recipe will have neighbors knocking on your door as the smell drifts down the road…it’s true.

It’s an easy recipe that looks like a million bucks when your done.  That works for me.

Mini Apple Bundt Cake Recipe from KimberlyLayton.com


apples for mini apple bunt cakes on kimberlylayton.com

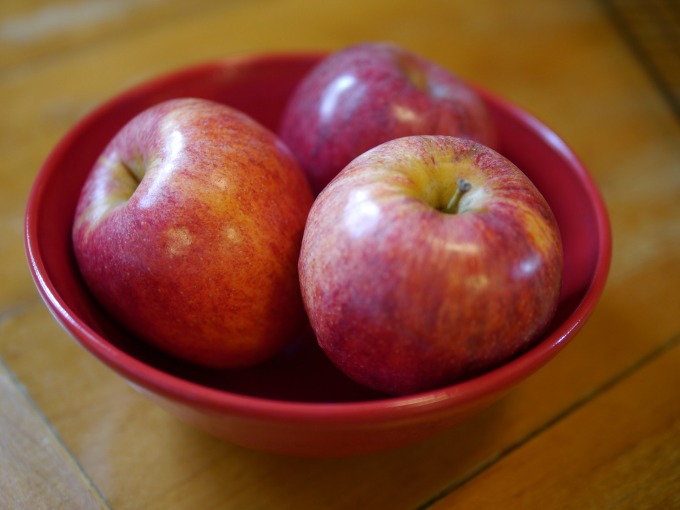
 Gather a bunch of apples and bake up a batch or two of these today.

Apple Bundt Cake Recipe - Supplies on KimberlyLayton.com

Mini Apple Bundt Cake Recipe

Makes 6 Mini Budt Cakes
Prep Time – 20 mins.
Cook Time – 25 mins.
Bake 350 degrees
Ingredients: 
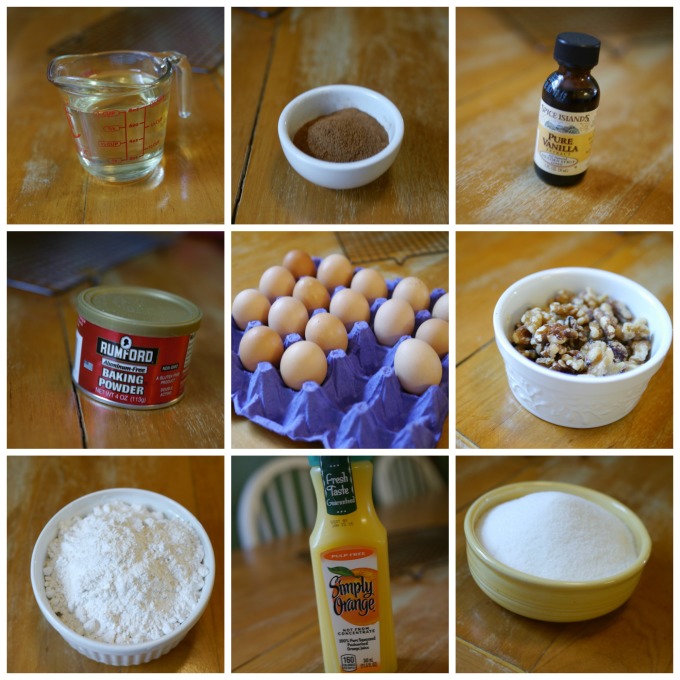
  • 1 1/2  cup All-Purpose Flour
  • 1 1/2 cup apple or 2 apples
  • 1 cup sugar
  • 3/4 cup walnuts {crushed}
  • 1/2 cup vegetable oil
  • 2 eggs
  • 1 1/2 tsp baking powder
  • 1 tsp cinnamon
  • 1/8 cup orange juice
  • 1 1/4 tsp vanilla
  • 1/4 tsp salt

baking up a batch of mini bundt cakes on kimberlylayton.com

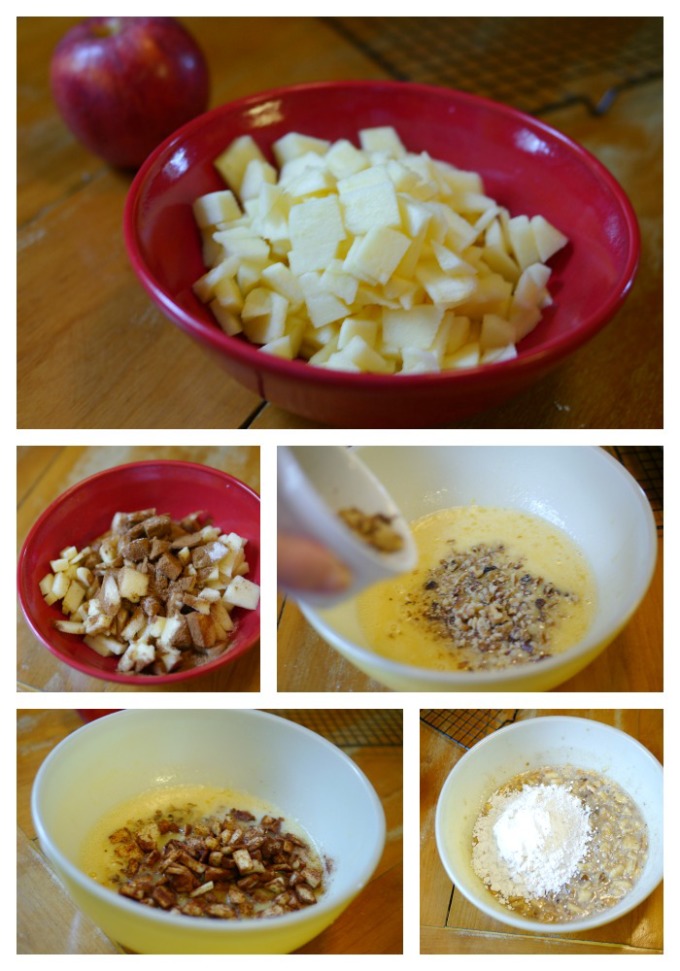
Cut up the apples into small pieces.  In a small bowl combine the apples, cinnamon and half the sugar.  Stir together and set it aside.

In a large bowl combine the rest of the sugar, vegetable oil, orange juice, vanilla, and eggs.  Mix together until blended.  Stir in flour, baking powder and salt.  Mix well.  Add in apple mixture and crushed walnuts.  Mix again…I used a hand-held mixer.

making bunt cakes - kimberlylayton.com

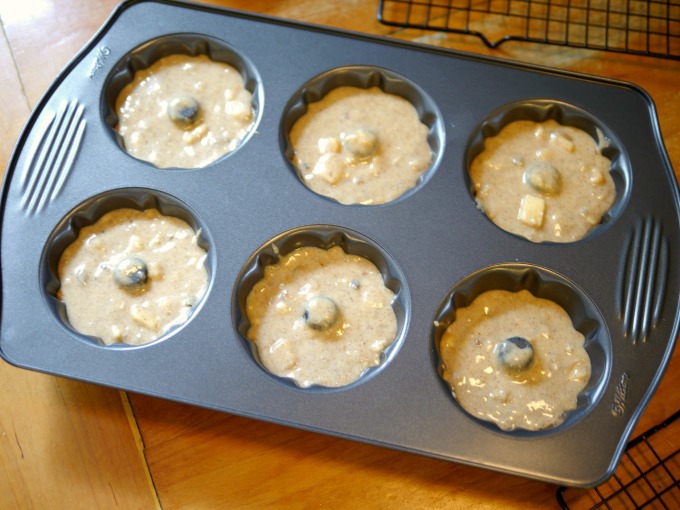
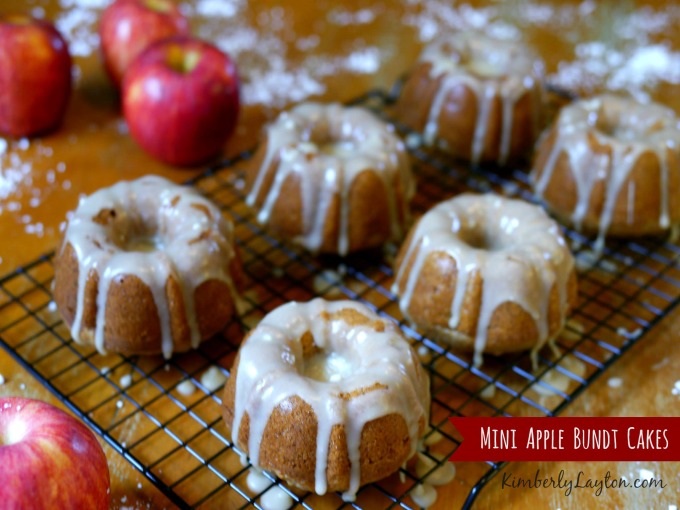
This recipe works perfectly with my mini bundt pan {that I seriously love}.  This pan makes anything bake up pretty!  You should be just the right amount to make 6 mini bunt cakes.

Do not grease the pan…there’s no need.  Fill to about the 2/3 point in each section.

baking mini bunt cakes on kimberlylayton.com

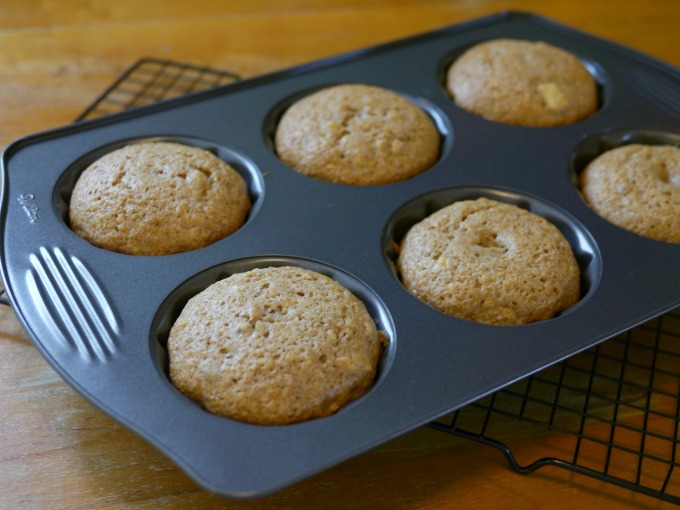
Bake for about 25 minutes or until the center is springy when you touch it.  {Very professional lingo, right?}

Perfectly bundt - bunt cakes - KimberlyLayton.com

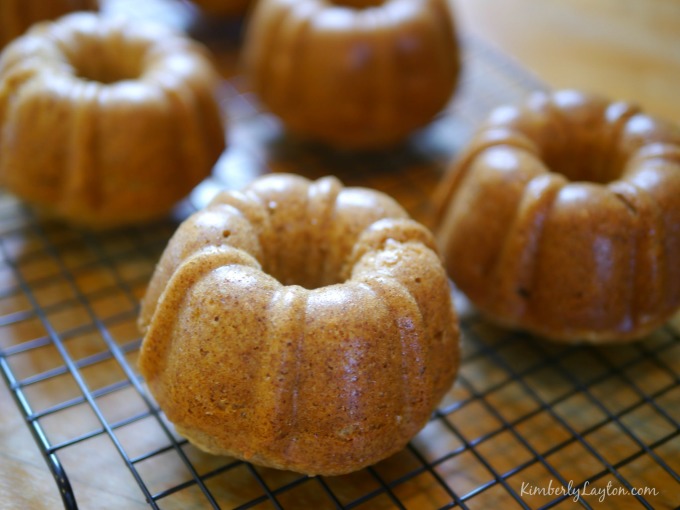
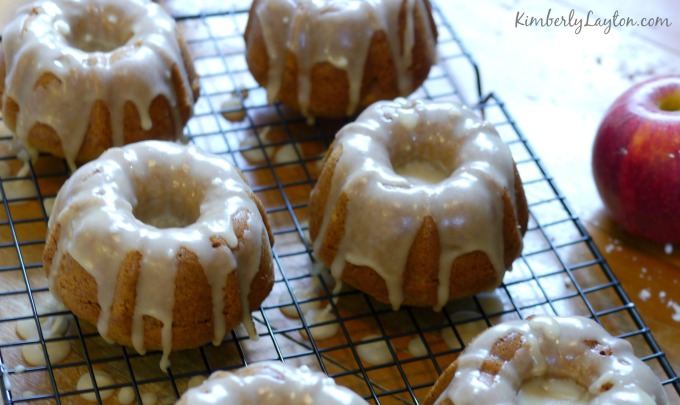
Once they cook, let them cool in the pan for 5-7 minutes.  Then just flip them over and they should pop out.  Just awesome!  I use these lovely cooling racks to help out.   Don’t they look pretty just like this?!

Let them cool for a bit and the add some glaze…

making glaze for bunt cakes on kimberlylayton.com

 Glaze Recipe

Ingredients:

  • 1 Cup Powdered Sugar
  • 1/2 Cup Brown Sugar
  • 1/4 Cup Unsalted Butter {softened}
  • 3 Tablespoons Milk
  • 1 Teaspoon Vanilla Extract

Use a 2 quart sauce pan and bring the brown sugar, milk and butter to a boil over medium heat.  Boil for 2-3 minutes.  Keep whisking it so it doesn’t burn.  Remove it from the heat.  Add the powdered sugar and vanilla.  Mix with an electric mixer on medium speed until smooth and slightly thick.  Pour right away over your Mini Apple Bundt Cakes.  Yum!  Sprinkle extra walnuts on the top if you wish.

Mini Apple Bundt Cake by KimberlyLayton.com

 That’s all there is to it…easy & yummy!

Apple Bundt Cake Recipe on KimberlyLayton.com

Do you make bundt cakes often?  They always seem so homey and inviting to me.

Let me know how your Mini Apple Bunt Cakes turn out!

~Kim

Filed Under: Food Tagged With: apple bundt cake, baking, glaze, homemade, mini bundt cake, recipe

DIY Lime & Coconut Body Scrub

October 31, 2014 By Kim

DIY Lime & Coconut Body Scrub by Kimberly Layton

This DIY Lime & Coconut Body Scrub is the perfect gift!  Create a batch and share some.  It makes you skin feel amazing while filling the room with a fresh smell that’s sure to make you happy!

Gather up your supplies and you can make a large batch of these in less than 30 minutes…for real!

Free Lim & Coconut Body Scrub Printable

Print out these simple & sweet labels to top them off.  I love the look of craft paper, but you can print them on any color…get creative and have fun.

{You can download the printable at the bottom of this post.}Supplies for bath salt - kimberlylayton.com

Supplies…

  • 2 1/2 cup Epsom Salt
  • 25-30 drops doTERRA Lime Essential Oil
  • 6 Tablespoons doTERRA Coconut Oil
  • 3 Tablespoons Vitamin E Oil
  • 1 Lime
  • 1/2 cup Shredded Coconut
  • 4 oz. Mason Jars  {I love these…what a perfect size!}
  • Plain Printable Sheet of Label Paper

The supplies are rather simple and I’ve included links at the bottom of this post to make your shopping easy.

Feel free to add or change things up a bit.  It seems like it would be hard to really mess up.  This recipe will give you a fresh smelling body scrub that leaves you skin feeling amazing!

Making Body Scrub on KimberlyLayton.com

You can mix this up in just a few minutes!

Start by adding your Epsom Salt to a large bowl or measuring cup.

There are a million uses for Epsom Salt, and when you read about all the health benefits you’ll decide to add it to everything…lol!

Making Body Scrub by Kimberly Layton

Add the coconut oil and vitamin E to the salt.  Mix it up.

I sell doterra on KimberlyLayton.com

Add your doTERRA Lime Essential Oil.  Yes, I sell it.  Why? Because it’s awesome and I’ve been using these oils for years.  The quality is amazing, the health benefits are fabulous and you can use so much less than cheaper brands for a project like this.  Trust me!

Add Lime to the body scrub - KimberlyLayton.com

Mix it up again.  I added the zest of a lime to the mix for a touch of color.

Bath salt DIY on KimberlyLayton.com

Mix it up again and this is what you have…Lime & Coconut Body Scrub.

Lime & Coconut by KimberlyLayton.com

Don’t you think they would make a sweet little gift?  I wish you could smell these…the whole office is smells amazing!

Use a 2-3 tablespoons, or use just a tablespoon for hand washing.  Your hands will thank you!

DIY Body Scrub Tutorial on KimberlyLayton.com {Lime & Coconut}

Wasn’t that easy??

You can download the printable Lime & Coconut Body Scrub labels right here.

—> PDF PRINTABLE LABELS DOWNLOAD <—

Just trim them or use a large hole punch to make them fit to your container. I’m a major fan of this size mason jar and these little wood scoops.  I feel like they take it to a whole new level of homemade goodness.  Add a ribbon or twine and you are finished!

If you like this kind of homemade projects you might like these posts…

  • Homemade Lavender Bath Salt
  • DIY Lush Inspired Bath Bombs
  • Homemade Lip Balm & Printable
  • Homemade Citrus Soap Tutorial
  • 101 Handmade Gifts for Her

Are you interested in learning more about selling doTERRA Essential Oils?  Here’s a post I wrote that should give you all the information you need and answer some of those questions you might be having right now. 🙂  I’ve been selling doTERRA for a year now and have used doTERRA Essential Oils for over 5 years…so, please email me any questions you might have! Kim@EverythingEtsy.com

Have fun creating your own handmade gifts!

~Kim

Here are the key ingredients:

Epsom Salt
shop now
DoTerra Lime
shop now
DoTERRA Coconut Oil
shop now
Mason Jars
shop now
Kraft Sticker Paper
shop now
E Oil
shop now

Filed Under: DIY, doterra essential oils Tagged With: body scrub, DIY, diy essential oil, diy gift, doterra, doterra essential oils, Essential Oils, handmade, handmade gift, homemade, Lime and Coconut

How to Make Lavender Sachets

October 22, 2014 By Kim

Lavender Sachet Tutorial by Kimberly Layton

Lavender sachets are one of my all-time favorite handmade gifts to share.  They can be made to match anyone’s style from modern to vintage, and they are the perfect way to use up small fabric scraps or your favorite fat quarter.  These lavender sachets were featured in the beautiful Mollie Makes Magazine! 

How to make lavender sachets by Kimberly Layton

I sold hundreds of lavender sachets through my Etsy shop one year.  They were very popular for weddings and Mother’s Day.  I’ve always given them as Christmas gifts, and I always enjoy the process of making them.

The whole house smells amazing and you can mix up the fabric to create pretty, pretty sachets.

Learning how to make lavender sachets by Kimberly Layton

Here’s how I make them…

  • Cut 5” fabric squares {I usually cut a bunch at once}
  • Stack two squares with the right side facing inside.
  • Start sewing about 3/4 of the way down one side and continue around until you have a couple inches left and backstitch with your machine.  You want to leave a big enough opening to work with, so sew slowly.
  • I sew about 1/8” to 1/4” in from the edge.
  • Cut the corners off carefully. This helps the corners look nice when it’s finished.
  • Flip the sachet to show the right side of the fabric on the outside.
  • Flatten a bit and make sure your corners are nice by using your finger to push on the corners from the inside.
  • Sew around the edge again leaving the opening the same size.
  • I roll up some cardstock to use as a funnel and add my dried lavender using a little scoop.  {You can buy dried lavender right here on Amazon.}
  • Be sure not to add too much or it will be hard to sew closed!!
  • Shake your sachet to settle the lavender and then hold it carefully while you sew up the opening.

For the complete step-by-step tutorial on making lavender sachets {with tons of photos} read my post on EverythingEtsy.com!

Seahorse Sachets by Kimberly Layton

Embroider or stamp designs on the fabric before sewing them for a custom creation.

Handmade Lavender Sachets by Kimberly Layton

Once you start making these you will want to make a ton!  I have them all over the house and in my closets.  I’ve thrown them in the car…they make it smell wonderful!

You can make small ones to throw in the dryer.  Your clothes will have a nice light scent.  I’ve used them up to 10 times in my dryer.

making lavender sachets by Kimberly Layton

I hope you’ll make some soon!

For the complete step-by-step tutorial on making lavender sachets {with tons of photos} read my post on EverythingEtsy.com!

Have fun!

~Kim

Filed Under: DIY, Popular Tagged With: diy gift, diy lavender sachet, gifts for her, handmade, homemade, sewing tutorial, tutorial

Bath Bomb Tutorial

October 21, 2014 By Kim

Bath Bomb Tutorial by Kimberly Layton

Homemade bath bombs are an awesome afternoon project for any crafty girl!  I recently made these fabulous bath bomb using my Lush Inspired Bath Bomb recipe. They were featured in the beautiful Mollie Makes Magazine!

You can create bath bombs in so many different molds, so look at what you already have around the house before you get started.  Tart tins are super cute, small plastic containers and many soap mold will work perfectly.

Bath Bomb Recipe by Kimberly Layton

This is what you’ll need to make 12-24 bath bombs.

Supplies:

Baking Soda – 2 cups

Citric Acid – 1 cup

Corn Starch – 1 cup

Almond Oil – 3 tsp.

Essential Oils – 1tsp. total of Lemon & Lavender

Food Coloring – 8-10 drops

Rubbing Alcohol in a spray bottle

Creative Soap Molds or Mini Metal Tart Tins {I LOVE these!}

The links above will take you right to products I used to make your shopping a little easier!  I love getting my supplies delivered right to my door!

I use all high quality essential oils for my bath bombs and bath salts.  You use less with better oils and there are health benefits at the same time!  Try Lavender, Lemon and Peppermint together…it’s one of my favorite combinations!  Email me if you have any questions about oils and I’ll be happy to send you lots of helpful information!  KLayton1@comcast.net 

Bath Bomb DIY by Kimberly Layton

  • Add Almond Oil and your essential oils to a small container and mix well.
  • Add all the dry ingredients to a large bowl and mix well.
  • Slowly add the oils to your dry ingredients mixing as you go.  Take your time because you don’t want it lumpy.  I used a mixture of oils that help with allergy problems…we need it around here!
  • Add the food coloring while mixing.
  • Spray your mixture 5-10 times while mixing until it resembles the texture of damp sand that sticks together.  You might need to spray it a few more times to get it just right.
  • Add a heaping amount of your bath bomb mixture to your mold.  You just want to make whatever you use is not too shallow or your bath bomb will break easily.  These starfish are a little on the shallow side so I have to take extra time and care making them.
  • Press the mixture into the mold.  Add a bit more to the top and press it all over again.  This will make a very solid bath bomb.
  • Lightly mist the top of your bath bombs with alcohol.  I usually only spray one or two times and then press it down again.  If you spray too much your bath bomb with start to bubble!
  • Let it dry for at least 15 minutes.

Bath Bomb Tutorial on KimberlyLayton.com

  • Flip your mold over and lightly tap the mold with your spoon.  This will usually cause the bath bomb to pop right out, so be ready.
  • Mist the top of your bath bomb with alcohol.
  • Let it dry overnight.

Once you get the hang of making these you will think up a million different combinations of oils and creative molds.  They are a fabulous DIY gift anytime of the year.

There you go…now you don’t need to spend a ton buying them when you can make them for pennies!  WOOT!

Have fun!

~Kim

Filed Under: DIY, Featured Tagged With: bath bomb, bath fizzie, DIY, diy gift, Essential Oils, gifts for her, handmade, homemade

Loaded Potato Soup Recipe

September 5, 2014 By Kim


Loaded Potato Soup Recipe by Kimberly Layton

You know how there are some recipes you make over and over again.  This is one that I’ve been making for years that never falls out of favor with my family.  It’s easy and perfect for those cooler months when you want to cozy up around the fireplace.

This recipe is quick, but it has the taste of a soup that’s been cooking all day.

Ingredients:

  •  8 -10 small red potatoes
  • 6-8 bacon slices
  • 1 large sweet onion
  • 3 cups milk
  • 1 cup of heavy cream
  • 2-4 cups of chicken broth
  • 4-6 tablespoons all-purpose flour
  • 1 cup sour cream
  • 1 cup shredded cheddar cheese
  • 4-6 sliced green onions
  • Salt & Pepper to taste

potato soup recipe 1

Start by cooking the bacon in a pan.  I like it to be rather crispy, but do what makes you happy.  Bacon is a happy thing!

Once the bacon is cooked set it aside to cool and add you onion {coarsely chopped} to the pan to saute in the bacon grease.  No, this is not a low calorie meal…eat salad for lunch on the day you make this!

Saute onions for 10 minutes or until they are clear.  Then add half the flour and stir it together.  Add one cup of milk and the rest of the flour.  Stir it together while simmering for 5 minutes or until you have a nice thick batch of goodness.  If it gets too thick, just add a bit more milk.  It should be the same consistency as pancake batter at this point.

While you are making your bacon cut your red potatoes into small bite size pieces.  Then add them to the chicken stock in a large pot.  Bring it to a boil.  In 20-30 minutes your potatoes should be cooked but still slightly firm.

Add your onion mixture to the pot.

Crumble your bacon and add half of it to the soup.  The rest will be for your topping.

Add the rest of your milk and 1/2 cup of sour cream.  Bring to a boil.  Keep checking it to make sure it’s not sticking to the bottom…medium heat is best.

Let it simmer for 15 minutes then add your heavy cream.

Stir and check how thick it is…add a little chicken broth if you would like it thinner.

Add salt and pepper to taste.

Top it off - potato soup recipe by KimberlyLayton

Serve and top it off with shredded cheese, sliced green onions, bacon and even a spoonful of sour cream.  Whatever you love…add it.

I usually serve it with fresh bread.

Potato Soup Recipe by Kimberly Layton

It’s hard to beat the favorite recipe of mine.  Try it and let me know what you think!

Enjoy!

~Kim

Filed Under: Food Tagged With: fall recipe, homemade, loaded bake potato soup, potato soup, recipe, soup recipe

Primary Sidebar

Hi, I’m Kim!

Welcome to my blog about all things creative, Business Bliss Society, southern food, pottery and lots pretty things.

Don't forget to join my private Business Bliss Society group on Facebook!

For crafty posts and Etsy business tips check out my blog here... EverythingEtsy.com

  • Facebook
  • Instagram
  • Pinterest
  • Twitter

Subscribe Here:

Essential Oils Social Media Kit How to Start a Blog EverythingEtsy.com Start Selling Essential Oils Tutorials Gallery RemodelingGuy.net

Categories

Archives

Footer

Connect

I love to get to know my readers so leave me a comment on any post and you KNOW I'll get it!

I'm also at EverythingEtsy.com every day and HandmadeandCraft.com as well as a few other scattered places.

Feel free to contact me at Kim@KimberlyLayton.com!

  • Facebook
  • Instagram
  • Pinterest
  • Twitter

Copyright © 2026 · Kimberly Layton · All Rights Reserved · Contact Me | Privacy